So when I saw an amazing sensory box from Frugal Fun For Boys on my Facebook feed I pinned it immediately. While I was pinning it the boys caught sight and wanted one of their own. A couple of hours later I decided to have a look around to see if we had enough bits to make a more basic quick DIY version.
Showing posts with label Cardboard Box. Show all posts
Showing posts with label Cardboard Box. Show all posts
Sunday, 2 March 2014
Sunday, 17 November 2013
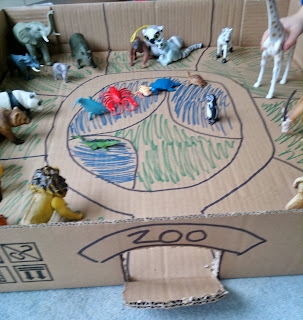
Zoo Small World - In a Cardboard Box
A couple of weeks ago our oven decided to break & keep tripping our electric. We ended up having McDonald's for tea that night & I started to panic about how i was going to cook the cakes & food for Joseph's party!
After a quote of at least £100 to fix it & with it being about 6-7 years old we opted to replace it. I can recommend AO.com for a very quick service ordering on the Saturday & having it delivered on the Sunday for only £9.99 extra!
Anyway getting to the point... the oven came packed with a box top & bottom. One of which was got ripped when we opened it, but the other one was perfect. So I asked Daddy to keep it, que rolling of eyes & 'what do you wan that for'. He is of the opinion that my box & other junk collecting is getting out of hand! So knew that I needed to use this one ASAP!
Daniel (3.5) & I decided that it would make a good Zoo, as we haven't had our animals out for a while now. Daniel decided that the water animals needed a pond in the middle & then we discussed what other animals would like to live together. I quickly drew the layout with a black permanent marker & used a green & blue to quickly colour it in. We then decided that it needed a entrance door so that people can visit.
I've discovered that using a pumpkin carving knife like a saw works really well on cardboard & as ours isn't sharp I don't need to worry so much about doing it while the boys are around. It does however make more of a mess than scissors but is so much easier.
Both boys have had lots of fun playing with this, though after being on the floor for a while its starting to get a bit battered. So it may well be in the recycle box this week, much to my husbands delight!
x Jo x
Saturday, 12 January 2013
Cardboard Box Storage
So I'm on a bit of a tidying & organising kick this year, I've not started let alone completed much yet however I thought I would share one small project that I have managed to do!
All of my Le Baby Bakery stock has had to live in our under stairs cupboard since we had Daniel, hes now 2.5 years old and I've never got round to organising this cupboard! Every time I need to choose the things to go in a nappy cake I end up taking nearly everything out spreading it all over the stairs & then having to put it all back!
 |
| Before... |
As I use a lot of nappies for my cakes & previously for the boys, I use a lot of Huggies boxes for storage. As I was taking these boxes in & out of the cupboard & searching for the contents, it occurred to me that it would be easier if i stood these boxes in their sides so that i could get things out & see things more easily. As I sorted through my large collection of Huggies boxes I had an idea to make something more permanent than a stack of boxes, a stack of boxes duck taped together!
Luckily I had several boxes that were the same width, I arranged these from tallest to shortest. And standing them on the floor (so the back would be flat) stuck them together using duck tape all the way round & back again. Once at the back & once towards the front. I then taped down the flaps of each box, which made this even more sturdy.
I then had the big task of taking everything out of the cupboard (hopefully for the last time) & then organising it in to the boxes. The top box has all my baby blankets, ready to use in nappy cakes, the next 2 hold all my fleece fabric for sewing. The second box up has several bags each containing all the things I need to make a cake, just add nappies, which are in the last box!
I'm really pleased how this quick & easy DIY project has transformed my cupboard, I even have floor space to walk in! I just need to find the time & motivation to organise the shelves on the left had side, which includes the rest of my fabric stash!
If you are looking for some organising tips & inspiration check out I Heart Organising, which is an amazing blog & they are focusing on home offices this month.
x Jo x
Subscribe to:
Posts (Atom)


